Only had a hour and a half to work on the car this weekend. Started by slightly trimming the footwell ally panel. It was a tight fit and clashed with a weld, so I made it get in easier. When I was going to apply some PU adesive to clamp it and leave it to dry, I noticed the can was dry. I must have closed and stored incorrectly. What a pity, it was a great product. Managed to extract just enough to clamp the panel. Left it drying to be riveted next weekend.
Following task was trying to center the shaft that runs through the hub on the rear wheel. I was using a tool that should be able to hold pipes but the shaft still slipped and WD40 didn't help me undo the nut. When I was puting it all back together it hit me that maybe with the brake disk in place the wheel will not rub on the shaft. I'll have to see if I can check that one of these week nights.
No pictures since nothing relevant was actually archieved.
Saturday, March 26, 2011
Saturday, March 19, 2011
Clutch Cable and Front Disks
Spent some time slightly shortening the bolt that should hold the clutch cable on the peddle because it was a hard fit. Later went to the car and used it. Steve from Aries had told me not to tighten the bolt too much because it should have some play, otherwise the cable would suffer. It's such a tight spot that I can't tighten the bolt. Need more small tools for it, since I bet Steve meant "don't over-tighten" and not "make is so that it will come apart after 2 red lights"...
Then, and after seeing pictures from another friend builder, I fitted the other end of the cable on the engine clutch lever. It looks nice! Unfortunately, I probably did something wrong since when I step on the peddle the clutch lever doesn't move all the way and then it doesn't go back to previous position when I lift my foot of. Will have to ask for help on this.
 Grabbed the front disks and bolted them on the front flanges. It's only hand-tightened since I forgot to take with me the allan keys. This has been happening almost every time since I have to carry all tools around to the car, no matter how much planning I do.
 I took with me a wheel to trial fit it on the rear hubs, that are basically done. Glad I did so. On the right side it went well and looks marvelous. On the left side it didn't work as well. The shaft that runs through the hub and is threaded on both ends was not centered. When I tightened the bolts last weekend it stayed bigger on one end than on the other. It's so off to the rear that it rubs the wheel inside. I tried to un-tighten that nut and move the shaft a bit forward to make it centered but the nut does not move and since both nuts tighten on the same direction, the other one can't help. I'll have to try again armed with some WD40. Otherwise, will have to ask for help on how to do it (cut off a bit of the shaft?).
Last bit was checking the ally panel to put on the passenger's footwell. I need to slightly trim a bit to make a better fit. My plan was to apply the PU adhesive and fit it so that it would dry and stick and tomorrow I would go with the driller and apply the rivets. Ends up I didn't have enough time for that.
EDIT: Later in the night I was still thinking about the clutch cable issue and suddenly I had an idea about how to make it work. The cable runs inside a bigger tube and the tube has nuts on both ends (as visible in the photo above). If I used the nuts to pull the tube away from the two ends, it would make the route longer. Today while showing the car to a cousin, I made the adjustment and I now have a fully functional clutch peddle!
Then, and after seeing pictures from another friend builder, I fitted the other end of the cable on the engine clutch lever. It looks nice! Unfortunately, I probably did something wrong since when I step on the peddle the clutch lever doesn't move all the way and then it doesn't go back to previous position when I lift my foot of. Will have to ask for help on this.


Last bit was checking the ally panel to put on the passenger's footwell. I need to slightly trim a bit to make a better fit. My plan was to apply the PU adhesive and fit it so that it would dry and stick and tomorrow I would go with the driller and apply the rivets. Ends up I didn't have enough time for that.
EDIT: Later in the night I was still thinking about the clutch cable issue and suddenly I had an idea about how to make it work. The cable runs inside a bigger tube and the tube has nuts on both ends (as visible in the photo above). If I used the nuts to pull the tube away from the two ends, it would make the route longer. Today while showing the car to a cousin, I made the adjustment and I now have a fully functional clutch peddle!
Sunday, March 13, 2011
Diff and Suspension Tightened Up
Bought me ear mufflers (from Bosh) and they were money well spent. I started my session opening up the holes with a 12mm drill bit and, although I was hearing noise, it seemed I was underwater. Noise far away and almost like as if it was nothing with me. Marvelous! I'm thinking about taking the mufflers with me to work so that I can concentrate on my code without disruption from some people around me more interested on the last soccer game than their work.
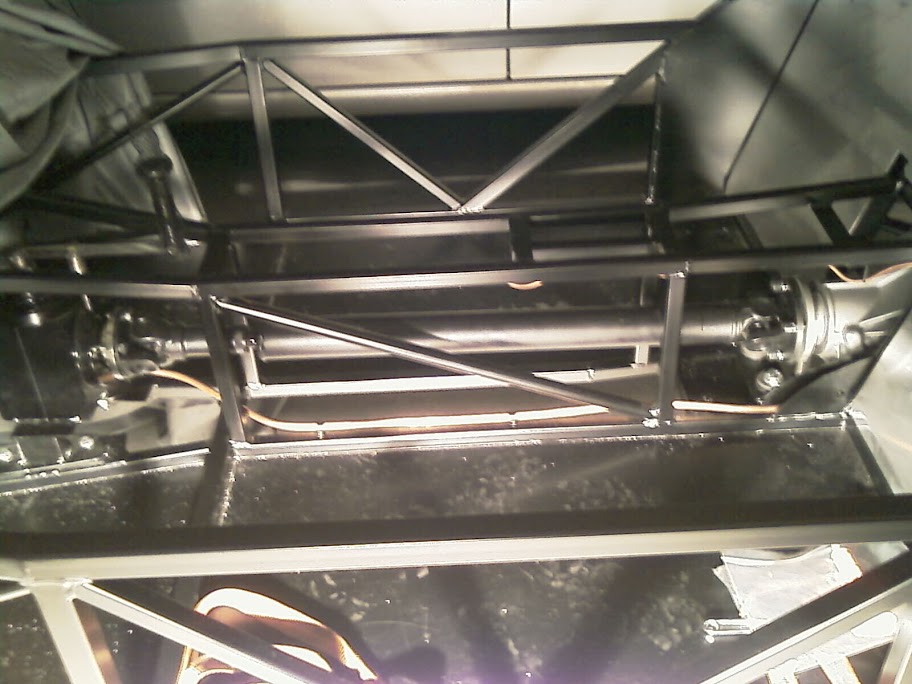
Back to the car... When I placed the rubber discs between the chassis and the upper diff support, I noticed that it made the holes "move away". I had to re-drill (or enlarge in an oval pattern) to be able to pass the bolts through... If I had paid attention to my trig classes in school, I would have guessed it... With the ear mufflers and the 12mm drill bit, it was painless. Then it was just a matter of tightening up the diff on the chassis. Pictures, just because last post had none...

 Then I went around rear and front suspensions tightening up all bolts. It took a while but it is all done now. I can move on to the "next stage"!
Final task was to put the clutch cable on the car. On the peddle side, it would be easier if the bolt was 2mm shorter, so I think I'll try to find a replacement or cut that one. On the engine side, I should have looked for pictures before attempting the task. The cable was getting lose, it seemed the clutch wouldn't release... I ended up not attaching it yet and will do it after "learning" how to.
Back to the car... When I placed the rubber discs between the chassis and the upper diff support, I noticed that it made the holes "move away". I had to re-drill (or enlarge in an oval pattern) to be able to pass the bolts through... If I had paid attention to my trig classes in school, I would have guessed it... With the ear mufflers and the 12mm drill bit, it was painless. Then it was just a matter of tightening up the diff on the chassis. Pictures, just because last post had none...


Final task was to put the clutch cable on the car. On the peddle side, it would be easier if the bolt was 2mm shorter, so I think I'll try to find a replacement or cut that one. On the engine side, I should have looked for pictures before attempting the task. The cable was getting lose, it seemed the clutch wouldn't release... I ended up not attaching it yet and will do it after "learning" how to.
Saturday, March 5, 2011
Tightening Bolts and Friend's Help
Today had a friend to help. He was one of the people that helped me on arrival day to carry the chassis with engine from the rented van outside the garage (it was too tall to go inside) to the parking space two floors bellow. He has some mechanical knowledge and with help from his father has restored two Volkswagen historical cars.
After showing him how things were since he had last seen the car, we went around tightening all the transmission bolts that I had previously done alone. He taught me a trick to add leverage to the allan key so that I could get more strength on the bolts. While he tightened them I was holding the wheel flange.
When we got to the prop shaft bolts, he told me to put the engine in gear. It was a wonderful moment when I realized how to engage gears on that engine. I'm now really into fitting the clutch cable and the gear linkage!
I had also planned for us to fit the front brake disks but his opinion was that I should save the disks to the end so that I would fit the wheels right after and thus protect the disks from dust and accidental bumps. I really was looking forward to fitting the brakes, but I guess I'll postpone that a bit.
We finished the session with me drilling the two holes on the chassis to bolt the diff's upper support. Turns out the 10mm drill bit I bought for this is not big enough, will still have to enlarge the holes slightly. But not now, my ears are still humming. I'm now really considering buying ear mufflers, specially since I still have loads of holes to drill to fit the body panels.
After finishing the diff, and since I'll postpone the brakes, it seems next tasks will be tightening the suspension bolts, fitting the clutch cable (:)), riveting the ally panel on the passenger's footwell and the the gear linkage (:)). Then... Gas and water pipework? And then electrical? I fear the electrical part...
Saturday, February 26, 2011
Driveshafts and Visitors
Today I left the house carrying a trolley full of tools and parts plus the driller's case under the arm. I hopped to have everything I could need for the session.
First task was to bolt the front diff support to the chassis. Couldn't do it alone, need someone else to hold the bolt in place... Then looked into the bolts that hold the prop on the diff. Don't have an Allen key big enough for them... It will have to wait until I go shopping again.
Moved to the rear. Before drilling holes to bolt the upper diff support on the chassis, I want to have the driveshafts in place, to be sure where the diff needs to sit. Opened the CV boot box and looked into it: the rubber boot, two straps and a CV grease packet. Seemed easy enough.
Turned the CV inside out, slid it into place, applied the 1st strap, repeat on the other side. Then slide the shaft inside one of the CV joints (Steve from Aries sent them already with bearings inside and greased) and put the circlip on the tip of the shaft, to keep it in place. Steve had packed all four circlips in a small bag, tapped to one of the shafts; can't miss it, it's a great help! The circlips didn't have small holes on the tip and seemed to stay stretched after putting them around the shaft. I'm not sure if I got it right, although it looked like it was. Again, repeat on the other side.


 Having it done, it was just a matter of offering it to the diff and upright and bolting it by hand first. Fortunately had an Allen key big enough for those bolts (it was my biggest one). Repeated it all for the other shaft. And now I have propulsion from the engine until the flanges!


On a side note, I had several visitors on the four hours I spent working on the car. Including the wife and kid. Summing all visits, I believe I did not work for around half-hour. One of the visitors was the father of a neighbor, in his 60s. "Oh, your doing a Super Seven!" It was the first time someone actually knew what I am building! And he new about Caterham, about kitcars... I was amazed!
Another visitor scared me a bit. I was facing the wall, fighting the shaft on the joint and the circlip... My back to the garage. Out of nowhere, a man with deep voice greets me. I look over my shoulder and see two police men looking at me. Ends up a neighbor called the station because she saw a strange man going inside the garage and, since we have had 3 robberies in less than two weeks, they came around patrolling inside the garage. What worries me the most is that if the cops managed to sneak on my back and scare me, a robber could sneak and whack me with my big wrench I had left inside the kit... Maybe I should work facing the garage, with my back against the wall. Cornered but aware... ;)
Next time... Drilling holes for diff support, tightening all rear suspension and arms bolts, fitting rear brakes...
First task was to bolt the front diff support to the chassis. Couldn't do it alone, need someone else to hold the bolt in place... Then looked into the bolts that hold the prop on the diff. Don't have an Allen key big enough for them... It will have to wait until I go shopping again.
Moved to the rear. Before drilling holes to bolt the upper diff support on the chassis, I want to have the driveshafts in place, to be sure where the diff needs to sit. Opened the CV boot box and looked into it: the rubber boot, two straps and a CV grease packet. Seemed easy enough.
Turned the CV inside out, slid it into place, applied the 1st strap, repeat on the other side. Then slide the shaft inside one of the CV joints (Steve from Aries sent them already with bearings inside and greased) and put the circlip on the tip of the shaft, to keep it in place. Steve had packed all four circlips in a small bag, tapped to one of the shafts; can't miss it, it's a great help! The circlips didn't have small holes on the tip and seemed to stay stretched after putting them around the shaft. I'm not sure if I got it right, although it looked like it was. Again, repeat on the other side.


On the first shaft, I filled the CV boots with grease and had a really hard time pulling them over the joints. For the second shaft I used a different and easier method. I turned the boot inside out, filled the cup of the joint and then pulled the boot over it. It was easier and cleaner too!


On a side note, I had several visitors on the four hours I spent working on the car. Including the wife and kid. Summing all visits, I believe I did not work for around half-hour. One of the visitors was the father of a neighbor, in his 60s. "Oh, your doing a Super Seven!" It was the first time someone actually knew what I am building! And he new about Caterham, about kitcars... I was amazed!
Another visitor scared me a bit. I was facing the wall, fighting the shaft on the joint and the circlip... My back to the garage. Out of nowhere, a man with deep voice greets me. I look over my shoulder and see two police men looking at me. Ends up a neighbor called the station because she saw a strange man going inside the garage and, since we have had 3 robberies in less than two weeks, they came around patrolling inside the garage. What worries me the most is that if the cops managed to sneak on my back and scare me, a robber could sneak and whack me with my big wrench I had left inside the kit... Maybe I should work facing the garage, with my back against the wall. Cornered but aware... ;)
Next time... Drilling holes for diff support, tightening all rear suspension and arms bolts, fitting rear brakes...
Thursday, February 24, 2011
More on the Prop Shaft
Spent my "car time" on the weekend moving parts and tools out of my storage room on the parking area to a room in the house. All because some robbers have been hitting the building storage rooms and I don't want to have missing or damaged parts.
So, tonight I went for a bit of car fun, to compensate. Problem is that, since I have to take all tools and materials that I believe will be needed, I ended up forgetting two tools, so I couldn't really finish what I wanted.
Started by bolting down the front of the diff support to the car. Ends up I need two spanners for that and had only taken one... Moved to the second (bigger) prop shaft. Recalling what I learnt almost two weeks ago, I got it done easier, although it still took me the best of 40m to do the four bolts there. Then I moved to the other side of the shaft, that bolts on the diff. And, again, I forgot the type of tool to do those bolts, so they got just temporarily done by hand.
 On the weekend, after tightening the bolts that got just half done today, I'll drill the holes to bolt the rear diff support to the chassis and then work on the half-shafts that link the diff to the rear wheels.
So, tonight I went for a bit of car fun, to compensate. Problem is that, since I have to take all tools and materials that I believe will be needed, I ended up forgetting two tools, so I couldn't really finish what I wanted.
Started by bolting down the front of the diff support to the car. Ends up I need two spanners for that and had only taken one... Moved to the second (bigger) prop shaft. Recalling what I learnt almost two weeks ago, I got it done easier, although it still took me the best of 40m to do the four bolts there. Then I moved to the other side of the shaft, that bolts on the diff. And, again, I forgot the type of tool to do those bolts, so they got just temporarily done by hand.
Sunday, February 13, 2011
Prop Shaft and Tricks of the Trade
After getting my prop shafts greased on a repair shop, I could finally get them on the car and move on with the rear axle and, actually, all propulsion.
Started the session with help from the wife to tie the prop shafts loosely on their locations and then to get the diff in place. I had tried before to put the diff on the car alone. I couldn't make it. But two people did it easily.


 After that, I spent two hours trying to bolt the smaller prop shaft on to the engine and the MNR reverse box. And this is where tricks of the trade are important. Once I figured out what I was doing wrong and the trick to it, I bolted it all in 15m. But let me explain in (painful) detail what the problem was and how I solved it...
I extended the prop shaft to be in contact with both ends and placed a bolt in each end to hold it in place. The problem was that I couldn't fit a tool in there to bolt it, had to do it with just my fingertips. And then, the bolt head would clash with the universal joints parts and would not rotate or not even go straight. So it seemed some wouldn't go in because they didn't align...
The trick I wish I knew or had found in less than 2 hours... I put one bolt on a hole and, with the shaft away from the reverse box, bolted it just a bit. repeated with all other bolts. As the bolt head was away from the UJ, I could use a spanner. And as I tightened just a bit of each bolt and went around, the shaft got closer and closer. Near the end I placed some Pattex Nural 50 (equivalent to Loctite) on the bolt threads and fastened them until they were completely home. Bolts also had a kind of a colar that prevents them from unfastening with trepidation, but I sleep better putting some Nural in them.
 The longer rear shaft is still just tied to the car, will have to wait for next weekend...
Started the session with help from the wife to tie the prop shafts loosely on their locations and then to get the diff in place. I had tried before to put the diff on the car alone. I couldn't make it. But two people did it easily.


I extended the prop shaft to be in contact with both ends and placed a bolt in each end to hold it in place. The problem was that I couldn't fit a tool in there to bolt it, had to do it with just my fingertips. And then, the bolt head would clash with the universal joints parts and would not rotate or not even go straight. So it seemed some wouldn't go in because they didn't align...
The trick I wish I knew or had found in less than 2 hours... I put one bolt on a hole and, with the shaft away from the reverse box, bolted it just a bit. repeated with all other bolts. As the bolt head was away from the UJ, I could use a spanner. And as I tightened just a bit of each bolt and went around, the shaft got closer and closer. Near the end I placed some Pattex Nural 50 (equivalent to Loctite) on the bolt threads and fastened them until they were completely home. Bolts also had a kind of a colar that prevents them from unfastening with trepidation, but I sleep better putting some Nural in them.

Subscribe to:
Posts (Atom)