Build diary for my first kit car: an Aries Locoblade (http://www.ariesmotorsport.com/) that I will be building in Portugal for the next months (or years).
As planned, spent the initial period of this week's car time looking into the indicator's electrics. In the end, destroyed 1h30m of work that I was not happy with and will wire the wing indicators from the loom terminals near the scuttle, using long cables. And the nosecone indicators are plugged where they should, in the front end of the loom.
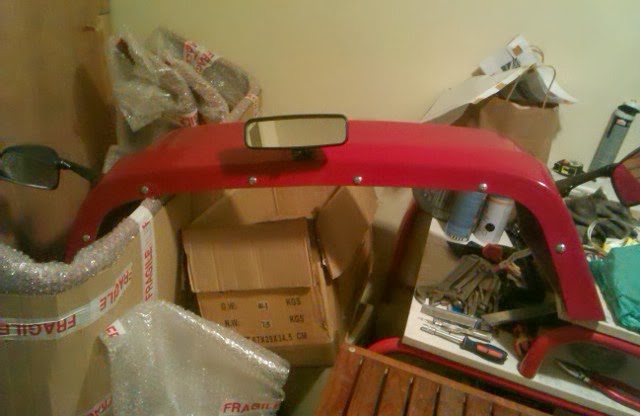
Liberated from that hurdle, prepared the nosecone to be fit. Had to file slightly the holes on the fiberglass to match them with the ones on the chassis and tape the indicator wires so that they would be somewhere I could reach. After that, just fit the thing, a bit more filing and bolted down the 4 bolts. It took the doomed-headed-squared-oddities near where the hood will fit and two that look like wood bolts with washers through the fiberglass and chassis, near the headlight beams.
I'm very happy with how the car ir looking. After taking the photo placed some bubblewrap over the fiberglass, since I cover the car when not working on it and don't want the cover to scratch the fiberglass.
Next week will be attaching the scuttle and marking the hood for cutting (because of the airbox).
Started this session by fitting the aeroscreen on the scuttle. Not as hard as I thought it would be. Took the time to also drill the four holes on the bottom that will bolt down to the chassis.
After this was done, trial-fitted the nosecone and marked for drilling the chassis near the headlights. Drilled the holes and then spent some time working on the electrics.
I believe I mentioned when I attached the headlights to the loom that it was temporarily done (butchered). These are now correctly connected to the loom with bullet terminals on the wires.
Also looked on how I'll do the indicators but did not start the work. The problem here is that, when I bought the car, there were indicators on the nosecone, the sides of the scuttle and the rear. Since then IVA rules changed a bit and now I need to have them on the nosecone, front wheel wings and rear. This means that the loom terminals near the scuttle must be abandoned and the ones in the front used for both nosecone and wings indicators. Since I don't have a big variety of connector types, I have to be a bit creative doing this. The plan is drawn, just need to do it before fitting the nosecone (for ease of access to the wires)
It was a good session and I'm eager for the next, since I'll end up with the nosecone on the car, if all goes well. Maybe even with the scuttle too!
Almost a month and a half later, I'm back working on the car. Several other things got in the way but the three hours spent today were very good.
Last weekend I had some friends over and they wanted to see the car working. So I took each one of the three for a couple of laps around the garage. It was fun and now I have my fuel tank almost empty.
First small job today was to try to tighten the front lights since they were really lose. I don't have a deep socket so I used pointy pliers, otherwise would have to go shopping. The pliers did the trick.
Then I separated the scuttle from the dash panel and left the dash on the car. The scuttle was taken to the storage room where I drilled a few holes (after lots of measuring) to put the rear-view mirrors in. This is the final look:
I think the side mirrors may be switched around, will have to look better into it. The kid came around as I was finishing up so it was him, eager to help, that tightened all the mirror's bolts.
Next task will be to drill the holes below to fit to the chassis and put the "tiny windscreen".
(long overdue post, this work was done almost a month ago, I haven't been able to work on the car lately; hope next week...)
Today I was committed to finish the nosecone. First I had to drill the sides for the bolts that connect with the chassis near the hood. These are doomed bolts that have a square section at the rear. Since I don't have a Watts drill to make square holes, did it the hard way. First drilled a round hole. Then, with a small file, squared the hole until it was a snug fit.
Then it was time to drill for the indicators. First I remeasured the drilling spots, using a level to be sure the nose was sraight before measuring. Placed again paper stalks just to get an idea. Then I drilled the big hole for the indicador hollow bolt through which the wire goes and a smaller one for some sort of guide that helps ensure the indicator is in the right position. Indicators bolted and job done!
Since I had the driller around, drilled the two holes on the lip almost where the rear of the nose goes down (over the area where the light stalks are), where other bolts will go through and attach to the chassis. The only thing missing is to drill the two holes on the chassis. The kid has been asking me to come help, so I'll probably let him drill those holes.
After some time away due to vacations, I was back for a bit. I've also been procrastinating a bit since I'm uncomfortable with drilling the fiberglass.
First small task was to unpack the indicators that go on the nosecone. They came with two extra bulbs and an indication from Steve from Aries about changing them. I did it and it seems the reason is down to light power. The bike indicators had 10W lamps and the replacements where 23W.
I had information from Steve on where to drill for the indicators. Also, to measure very well and many times because it will look odd if the indicators are not exactly at the same height when looking from the front. Besides this I also had instructions shared by my fellow builder Iain on how to hold the nosecone to the chassis.
Holding to this information, I spend lots (really, lots) of time covering the sides of the nose with tape and then measuring, remeasuring, creating paper indicators and gluing them to the spots and then putting the nose on the car to test it out.
In the end, I think it is right but I haven't drilled yet. And I'll probably remeasure and look at it again before drilling.
With the cooling circuit fixed, I had to stress test the circuit! And confirm that there were no other leaks. So, the wife and kid came to "help".
First drove the kid around the garage, 3 laps, one going up just one floor and the other two going up two floors. This all went a lot better than when I drove the car up to have my spot washed. The following video shows me pulling off, pursuing a neighbour on his BMW, while the kid screams with joy.
These 3 laps had as top speed 22Km/h (if the sensor is correctly set, can't confirm without going to a track), 7500rpm (going up the slope, afraid I would stall) and cooling temperature rose up to 70C. Then the fan light turned on to warn me and I switched on the fan, keeping the temperature around 65C.
Then the kid went home and I drove the wife around, 2 laps, one up one floor and the second up two floors. She filmed so I even have inboard footage. I stall the car a couple of times and the lights are draining my battery, so I end up going for a bit without lights. It's not as dark as it seems on the video.
Notes from the driving... The "clank" noise I heard two weeks ago is still there, although not always. It only shows when I'm driving really slow and the car is almost stalling, otherwise no noise. It still seems to come from the tunnel and probably is nothing to worry about.
The panels that are just rivnutted (tunnel) vibrate a bit when on low revs and make a bit of a noise. I'll probably have to put some isolation tape under them to make the noise go away.
Comparing with last year, the wheels make a lot less noise while driving, setting up the camber and toe did pay off. One of the front wheels still wobbles slightly, I have to tighten it better. One of those times I wish I had a power tool to do it...
The battery charges if I have the lights off, with the Digidash saying 13,5 to 14v. If I turn the lights on, it drops to around 12v and it effectively drains the battery. With me constantly stalling the car, makes the charger I bought well worth it's cost. I probably have a bad earth or some other connector messing it up. After all, most of my light wiring is still lose around the car. That's what I'm going to work on next, along with panels.
It was wonderful to drive the car and I'll probably be doing it once in a while. Maybe I should service the engine, new oil and spark plugs, since what the engine has is what was on the bike the engine came from, 3 years ago... And I have to properly bleed the brakes!
This was a short morning in terms of what was done on the car because I started with some cleaning. I still had a box with parts inside the house (semi-hidden in our sleeping room). It was only half-full and I now have space for those parts on the underground storage room. So, I moved the box down and sorted the bits into smaller boxes, getting it all organized. Anyway, those parts are some of the ones I'll soon need (bodywork fixings, lights, ...).
During the week I went to a hardware store and bought a replacement T piece. Got a brass one, that should not rust and be sturdy. After lots of fighting it (it was a snug fit on the pipes), I got the cooling system re-established.
While doing this, took the cap of the expansion tank and looked inside. It seemed to have some dirt on the bottom. Since it was mostly empty, I unbolted it and emptied it. It actually was some aluminium swarf and either dirt or rust. Probably garbage that was inside the pipes... I forgot to wash them before fitting them. After the tank was "clean", added more fluid. Turned the car on and let it idle for a while while checking the liquid level and adding a bit more. After turning the car off, checked for leaks and stains on the floor and all looked dry and clean! It's time to drive the car again...