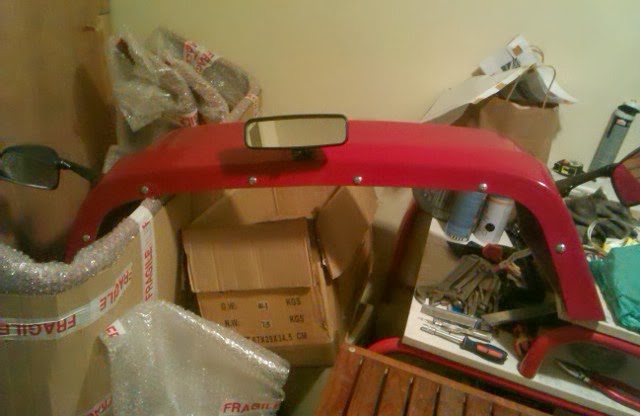
Nice work session. First task was to finish enlarging the hood hole to provide clearance for the airbox to come out. Eventually got done. Some trimming and polish on the hole borders and it was time to move on. The more I look to it, the more I want to try to modify the airbox to have a front-facing hole for the air to enter instead of the two original air entries that now sit under the hood.
With the hood sitting as final, marked where on the chassis I need to drill to fix the scuttle. Then removed it and started work to close the tunnel. Enlarged the previously marked bit of the tunnel panel. Tried it and it worked fine. Noticed how much of my foot protrudes into the tunnel. My foot there is safe, thanks to the prop catcher I added on that area. So, I just needed something to prevent my foot going too much inside and water coming in from there. Created a guard from a bit of scrap ally and used rivnuts to attach it to the tunnel cover. Tested it not only to check if my foot moved correctly but also if the part slid into place with the guard or it had to be attached afterwards. Since it slid with the guard, applied some plastic on the area to prevent water from getting in and closed the tunnel.
While closing the tunnel I noticed that there is still one wire under the dash that comes from the loom and connects nowhere. And two from the digidash not connected anywhere. I believe these are related to the indicators, but unsure. Something to tackle later.
But next steps are to put in the wires from the loom to near the headlights, for the front wing indicators. Then fix the scuttle into place and attach the hood catchers to the hood and car.
Build diary for my first kit car: an Aries Locoblade (http://www.ariesmotorsport.com/) that I will be building in Portugal for the next months (or years).
Saturday, January 25, 2014
Sunday, January 12, 2014
Hood Continued
Most of today's session was on the hood. But before I trial-fitted the tunel side plate and tested using the peddle with the new hole. It is a lot better, I can accelerate without stepping also on the brakes. The only problem is if I push back the foot too much and then try to move it to the brakes, it seems to get a bit caught. Marked for further cutting.
Then trial fitted the hood. Marked for more cutting and trimming and went through a few iterations of fitting, marking, cutting, fitting. In the end, my time was up and the hood still requires a very small trim on one side. It already fits but not perfectly. Anyway, left the part on the car and first took these pictures. Scuttle is also just placed there, not attached.
Sunday, January 5, 2014
Hood and Tunnel
First time on the car in a long time... And with a new year's resolution: to get the car on a track this year.
Fit loselly the scuttle and sticked some isolation sponge on the nose and scuttle so that I could put the hood in place. Then, spent some time measuring where I should cut the hood so that the airbox can protrude out. After some time, it was roughly measured for a first cut. I'm sure after this one I'll be doing a lot of trimming to get it right because it is really hard to mark where to cut from underneath.
Also measured the tunnel cover bit near the peddles, that I had to remove to be able to drive because my feet are too large. With the measured parts, went to the storage room and did some cutting. The tunnel bit drilled the corners and cut the rest with the saw. The hood was done with the cutting disk on the dremmel.
I did not have time to trial fit and check what more needs cutting, that will have to be done next session.
Fit loselly the scuttle and sticked some isolation sponge on the nose and scuttle so that I could put the hood in place. Then, spent some time measuring where I should cut the hood so that the airbox can protrude out. After some time, it was roughly measured for a first cut. I'm sure after this one I'll be doing a lot of trimming to get it right because it is really hard to mark where to cut from underneath.
Also measured the tunnel cover bit near the peddles, that I had to remove to be able to drive because my feet are too large. With the measured parts, went to the storage room and did some cutting. The tunnel bit drilled the corners and cut the rest with the saw. The hood was done with the cutting disk on the dremmel.
I did not have time to trial fit and check what more needs cutting, that will have to be done next session.
Sunday, November 24, 2013
Nosecone Is ON!
As planned, spent the initial period of this week's car time looking into the indicator's electrics. In the end, destroyed 1h30m of work that I was not happy with and will wire the wing indicators from the loom terminals near the scuttle, using long cables. And the nosecone indicators are plugged where they should, in the front end of the loom.
Liberated from that hurdle, prepared the nosecone to be fit. Had to file slightly the holes on the fiberglass to match them with the ones on the chassis and tape the indicator wires so that they would be somewhere I could reach. After that, just fit the thing, a bit more filing and bolted down the 4 bolts. It took the doomed-headed-squared-oddities near where the hood will fit and two that look like wood bolts with washers through the fiberglass and chassis, near the headlight beams.
I'm very happy with how the car ir looking. After taking the photo placed some bubblewrap over the fiberglass, since I cover the car when not working on it and don't want the cover to scratch the fiberglass.
Next week will be attaching the scuttle and marking the hood for cutting (because of the airbox).
Liberated from that hurdle, prepared the nosecone to be fit. Had to file slightly the holes on the fiberglass to match them with the ones on the chassis and tape the indicator wires so that they would be somewhere I could reach. After that, just fit the thing, a bit more filing and bolted down the 4 bolts. It took the doomed-headed-squared-oddities near where the hood will fit and two that look like wood bolts with washers through the fiberglass and chassis, near the headlight beams.
I'm very happy with how the car ir looking. After taking the photo placed some bubblewrap over the fiberglass, since I cover the car when not working on it and don't want the cover to scratch the fiberglass.
Next week will be attaching the scuttle and marking the hood for cutting (because of the airbox).
Saturday, November 16, 2013
Aeroscreen and Electrics
Started this session by fitting the aeroscreen on the scuttle. Not as hard as I thought it would be. Took the time to also drill the four holes on the bottom that will bolt down to the chassis.
After this was done, trial-fitted the nosecone and marked for drilling the chassis near the headlights. Drilled the holes and then spent some time working on the electrics.
I believe I mentioned when I attached the headlights to the loom that it was temporarily done (butchered). These are now correctly connected to the loom with bullet terminals on the wires.
Also looked on how I'll do the indicators but did not start the work. The problem here is that, when I bought the car, there were indicators on the nosecone, the sides of the scuttle and the rear. Since then IVA rules changed a bit and now I need to have them on the nosecone, front wheel wings and rear. This means that the loom terminals near the scuttle must be abandoned and the ones in the front used for both nosecone and wings indicators. Since I don't have a big variety of connector types, I have to be a bit creative doing this. The plan is drawn, just need to do it before fitting the nosecone (for ease of access to the wires)
It was a good session and I'm eager for the next, since I'll end up with the nosecone on the car, if all goes well. Maybe even with the scuttle too!
After this was done, trial-fitted the nosecone and marked for drilling the chassis near the headlights. Drilled the holes and then spent some time working on the electrics.
I believe I mentioned when I attached the headlights to the loom that it was temporarily done (butchered). These are now correctly connected to the loom with bullet terminals on the wires.
Also looked on how I'll do the indicators but did not start the work. The problem here is that, when I bought the car, there were indicators on the nosecone, the sides of the scuttle and the rear. Since then IVA rules changed a bit and now I need to have them on the nosecone, front wheel wings and rear. This means that the loom terminals near the scuttle must be abandoned and the ones in the front used for both nosecone and wings indicators. Since I don't have a big variety of connector types, I have to be a bit creative doing this. The plan is drawn, just need to do it before fitting the nosecone (for ease of access to the wires)
It was a good session and I'm eager for the next, since I'll end up with the nosecone on the car, if all goes well. Maybe even with the scuttle too!
Sunday, October 20, 2013
Rear-view Mirrors
Almost a month and a half later, I'm back working on the car. Several other things got in the way but the three hours spent today were very good.
Last weekend I had some friends over and they wanted to see the car working. So I took each one of the three for a couple of laps around the garage. It was fun and now I have my fuel tank almost empty.
First small job today was to try to tighten the front lights since they were really lose. I don't have a deep socket so I used pointy pliers, otherwise would have to go shopping. The pliers did the trick. Then I separated the scuttle from the dash panel and left the dash on the car. The scuttle was taken to the storage room where I drilled a few holes (after lots of measuring) to put the rear-view mirrors in. This is the final look:
I think the side mirrors may be switched around, will have to look better into it. The kid came around as I was finishing up so it was him, eager to help, that tightened all the mirror's bolts.
Next task will be to drill the holes below to fit to the chassis and put the "tiny windscreen".
Last weekend I had some friends over and they wanted to see the car working. So I took each one of the three for a couple of laps around the garage. It was fun and now I have my fuel tank almost empty.
First small job today was to try to tighten the front lights since they were really lose. I don't have a deep socket so I used pointy pliers, otherwise would have to go shopping. The pliers did the trick. Then I separated the scuttle from the dash panel and left the dash on the car. The scuttle was taken to the storage room where I drilled a few holes (after lots of measuring) to put the rear-view mirrors in. This is the final look:
I think the side mirrors may be switched around, will have to look better into it. The kid came around as I was finishing up so it was him, eager to help, that tightened all the mirror's bolts.
Next task will be to drill the holes below to fit to the chassis and put the "tiny windscreen".
Sunday, September 8, 2013
Finish the Nosecone
(long overdue post, this work was done almost a month ago, I haven't been able to work on the car lately; hope next week...)
Today I was committed to finish the nosecone. First I had to drill the sides for the bolts that connect with the chassis near the hood. These are doomed bolts that have a square section at the rear. Since I don't have a Watts drill to make square holes, did it the hard way. First drilled a round hole. Then, with a small file, squared the hole until it was a snug fit.
Then it was time to drill for the indicators. First I remeasured the drilling spots, using a level to be sure the nose was sraight before measuring. Placed again paper stalks just to get an idea. Then I drilled the big hole for the indicador hollow bolt through which the wire goes and a smaller one for some sort of guide that helps ensure the indicator is in the right position. Indicators bolted and job done!
Since I had the driller around, drilled the two holes on the lip almost where the rear of the nose goes down (over the area where the light stalks are), where other bolts will go through and attach to the chassis. The only thing missing is to drill the two holes on the chassis. The kid has been asking me to come help, so I'll probably let him drill those holes.
Today I was committed to finish the nosecone. First I had to drill the sides for the bolts that connect with the chassis near the hood. These are doomed bolts that have a square section at the rear. Since I don't have a Watts drill to make square holes, did it the hard way. First drilled a round hole. Then, with a small file, squared the hole until it was a snug fit.
Then it was time to drill for the indicators. First I remeasured the drilling spots, using a level to be sure the nose was sraight before measuring. Placed again paper stalks just to get an idea. Then I drilled the big hole for the indicador hollow bolt through which the wire goes and a smaller one for some sort of guide that helps ensure the indicator is in the right position. Indicators bolted and job done!
Since I had the driller around, drilled the two holes on the lip almost where the rear of the nose goes down (over the area where the light stalks are), where other bolts will go through and attach to the chassis. The only thing missing is to drill the two holes on the chassis. The kid has been asking me to come help, so I'll probably let him drill those holes.
Subscribe to:
Posts (Atom)