Sunday, June 30, 2013

Final (?) Driver's Side Panel Cuts and Exhaust

Based on last week's work, the goal today was to cut the frontal part of the driver's side in two pieces. One can be riveted, the other will be held with rivnuts, allowing access to the lower engine bay area. Dremmel followed by filing and emery cloth got me to the point below.
A trial fit was required to validate this last approach. Offered the exhaust to the engine and then tried fitting the panels. All seemed great. So, grabbed the Bardahl exhaust assembling paste, put some on the headers and attached them to the engine. Took some time getting it all tighten up.

Another trial fit was done to ensure once again it will work. There is a spot where I could enlarge the exhaust hole a bit to make it slide better, but it works as it is. Trial fitted the exhaust can to double-check the panel fits in and to check where the can is held to the chassis.

Next session will be riveting the panels to the chassis and then fitting the exhaust can and also attaching it to the chassis.

Sunday, June 23, 2013

More Driver's Side Panel

Shorter session on the car, all dedicated to the 1st third of the driver's side panel. Trimmed and cut extra to enlarge the exhaust hole. Mixed use of a cutting disk on the dremmel and a hand file.

Then test fitted the panel with the exhaust headers in place. Turns out that I should have mocked up this with cardboard. Now the hole was big enough but due to how the exhaust, chassis and panel are, I can't move the panel enough to remove it and gain access to the desired area.

After some thinking, seems I'll further have to cut this panel in two parts, diagonally, so that the front part is small at the top and large at the bottom and can be rivetted. The rear part will be big at the top and small at the bottom and will be rivnut'ed in place. This will allow removing just that bit and gaining access to the brake oil reservoirs and the engine's oil filter. Left that cutting for next session.

Sunday, June 16, 2013

Driver's Side Panel

I would feel bored if I was to take another session trimming the 1st third of the driver's side panel. So, and taking advantage of the fact that the neighbour that parks on my kit's left side was away, I decided to fix the rear two-thirds of the driver's panel.

After some pains doing the passenger's side and some observations I did regarding drilling, this time it went a lot easier. So easy that in a single session I applied all rivets, top and bottom! And still had time to trial-fit the front part, without the exhaust headers in place.
Next session will be to finish trimming the front (removable) panel and getting the rivnuts in.

Sunday, June 9, 2013

More Panel Trimming

Had some time to continue the work on the front section of the driver's side panel. Finished the cut for the exhaust pipe. Took the panel to the car for a test fit and it did not go as I hoped. I thought I could put the panel in without taking the exhaust headers from the engine. Unfortunately, when I slide the panel passing the exhaust headers through the hole, it hits the chassis and does not fit.

Took the headers off and then did a test fit without them. Noticed that an additional part of the lip must come out otherwise I can't fit and remove the panel using rivnuts. Anyway, to validate the hole, tried fitting the header through the hole to get it in place and I couldn't. It hit the steering column and I couldn't twist it into place.

Took the panel (and exhaust headers) back to the storage room (where I've been working the past sessions). Cut the extra bit on the lip and filed away the whole to make the curves nicer and give a bit more room on one corner. Left it there, will test fit again next time. Hopefully, will only need some small filing.

Sunday, June 2, 2013

Driver's Side Outer Panel Cutting

Today just worked with the dremmel and cutting disks. Actually also used a small electric saw for a bit, but shouldn't have...

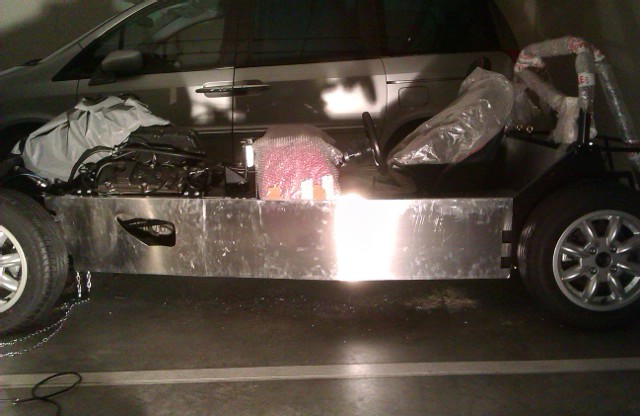
So, first drew a line on the driver's side panel to mark where to cut. Idea is to separate the rear 2/3's from the front third. The rear gets riveted in place, the front will be held with rivnuts to allow easier access to oil filter, brake cylinders, etc.
Doing the whole straight line with the dremmel was going to take forever. So, after cutting the tips, used the electric saw. Problem is that I can't actually cut a straight line with that and it notices a bit. I filed the parts a bit to hide the small waves but it's not as good as it would have been with only the dremmel. I wonder how much it will be noticeable on the car. Anyway, in retrospect, I shouldn't have used the saw.

Offered the front part to the car to check where I had to cut the upper lip due to the engine cradle anchor points. After trimming those two spots down (just with the dremmel), moved on to the exhaust hole. Transferred the template I did last week and started cutting. This time using just the dremmel. But I did not have enough time to finish the cut. More next week...