After much postponing, I went to do the oil change. It was one of the jobs I liked the least, mainly because I don't like greasy stuff on my hands. But I hate wearing gloves. But let's get on with the details...
First I swapped the rectifier with the new one just arrived from the UK. Plugged the battery in, started the engine and tested the voltage. The Digidash still reads less than 12v when I turn on the lights... So the problem is not with the rectifier. I'll have to research what other components may be causing this. At least I now have a spare for a part that usually fails.
While the engine was warming up the oil, jacked up the car so that the pan would fit under the engine. Having the car up a bit, the Digidash was reading 22º for the oil temp. Should be more but having the temp reader on the end of a pipe is known to not be the best solution. When I untightened the drain plug, after turning the engine off, it SURE was hotter!
All oil drained, removed the oil filter. And made a mess of my garage floor. Forgot to put some newspapers under the car and the filter contained oil that was then spilled. Cleaned the mess, placed the newspapers and then closed the drain and moved the old oil from the pan to 2L Coke bottles. I now need to find a place that can take them to be recycled. There was almost no deposit on the pan, just 3 or 4 "flakes", almost like bits of paint. I hope this means I have a strong gearbox! To reach the filter, removing my side panel wasn't enough. Had to unbolt and take off the nosecone too.
Unpacked the new filter, smeared the seal with the new oil and fitted it. Then used a funnel to feed the remaining oil into the engine. I wanted to follow Andy's (from AB Performance) instructions but ended up just putting the whole 4L of oil inside the engine. It should be good as the Haynes manual said the engine would take 3,7L if I changed the filter.
I didn't recall the PSI figures when the engine was running. So I cranked with no spark and relieved a bit the filter. PSI rose to 7, I thought it should be enough. Added the spark and cranked the engine. It fired into life at around 40PSI... Ups :)
Left the car on stands because next task will be to fix the wobbly front wheel, that will imply removing the wheel. After that I should really take it to a track. Even without fixing the electric issues and the battery charging...
Saturday, December 6, 2014
Sunday, November 16, 2014
More driving around!
After pressing the small nipples of the spark plugs on the bench and using a wrench on the plugs, the nipples came off. 5 minutes for 4 sparks. Fit them on the car and went for a ride. Actually, lapped around the garage for a bit over one hour. The wife drove a bit too. Took her around, drove the kid and also the mother-in-law. Great afternoon.
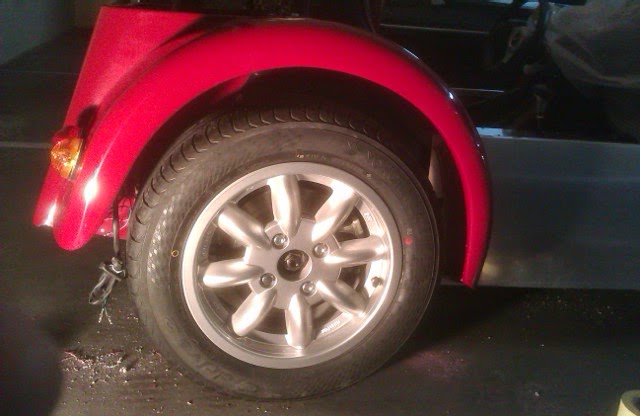
On this photo it is clearly visible that the full lock on the steering makes the tires hit the headlights that, fortunately, are not fully tightened.
 Another photo and a video.

Used 2nd gear for the first time. By the end of the hour, the brake peddle was sticking midway and would brake a lot further down. Wonder if it was tired from braking a lot or some other problem.
Water temp rose to 99º. Turned the fan on (minimum) and it went down to a stable 84º. Couldn't use max speed because the rectifier is really broken. With dip beam the battery does not charge. Running lights and fan at max speed and the battery warning light would light up!
When I stopped the car, no liquids dripping on the floor! Great!
Next I have to replace the oil and the oil filter... And take care of the wobbly front wheel!
On this photo it is clearly visible that the full lock on the steering makes the tires hit the headlights that, fortunately, are not fully tightened.
Water temp rose to 99º. Turned the fan on (minimum) and it went down to a stable 84º. Couldn't use max speed because the rectifier is really broken. With dip beam the battery does not charge. Running lights and fan at max speed and the battery warning light would light up!
When I stopped the car, no liquids dripping on the floor! Great!
Next I have to replace the oil and the oil filter... And take care of the wobbly front wheel!
Sunday, November 2, 2014
Servicing The Engine (Part I)
After a month, I'm back at the car. The idea was to service the engine and maybe take care of the issue with the front left wheel.
Spent loads of time removing the spark plugs, setting the spacing on the new ones and trying to fit them. In the end had to remove the new ones from the engine because they have a "fat thing" where the leads connect to and the leads don't fit. Probably those things can be removed but I applied some strength with pliers and failed. Before applying more force, decided to look online, so left the car with no spark plugs.

 The old plugs are NGK CR9EH and the new ones are the upgraded NGK CR9EIX Iridium ones. The old plugs all had the dark colour from the photo. From the guide on the Haynes manual, it means probably too rich, idle screw problems or blocked air filter. Probably all... Otherwise it can be oil on the chambers and that is more problematic. But since the engine does not seem to lose oil, I guess it is not that.
Then swapped the air filter. Removed an original Honda and placed a HiFlo equivalent. Quick and easy job.
 Next time I hope to fit the spark plugs so that I can start the engine to heat up the oil a bit. Then get the car on stands to remove the oil and replace the filter. Being realistic, the front wheel will be another session.
Spent loads of time removing the spark plugs, setting the spacing on the new ones and trying to fit them. In the end had to remove the new ones from the engine because they have a "fat thing" where the leads connect to and the leads don't fit. Probably those things can be removed but I applied some strength with pliers and failed. Before applying more force, decided to look online, so left the car with no spark plugs.
Then swapped the air filter. Removed an original Honda and placed a HiFlo equivalent. Quick and easy job.
Saturday, October 4, 2014
Finished (?!?) and a Drive
Well... All the parts I had are now fit to the car. It is actually finished. After 4 years and 2 months, what I thought would take less than a year is done!
Of course, I still need to fix the stuff I did wrong, service the engine, fit some needed mods... But... I have nothing more inside boxes. All is fitted to the car...
Today's session was to fix the tonneau. It was just a slow process of putting masking tape, marking a hole, drill, rivet the button in place, fix the tonneau, mark another hole, repeat. It took me a couple of hours. The buttons are a bit loose because the pop-rivet pliers could not hold the rivet correctly inside the button. Just as I was getting to the end of it (2 rivets to go) I noticed Steve from Aries had packed a bit of tube along with the buttons and rivets for this job. Putting the bit of tube over the rivet shaft allowed the gun to fix the rivet correctly in place and break the rivet cleanly. The last two are fixed as all should. Maybe one day I'll drill the others out and rivet them again properly. Maybe not... But another praise to Steve, he thought of these things and his attention to detail still amazes me.

 Once the tonneau was fixed in place I decided I'll not cover the car again. So I took out the remaining bubble-wrap I had on the roll bar to avoid scratching. Vacuum cleaned the interior of the car and the dirt on the fiberglass body (that would not go out with a cloth due to static electricity).
Now I should take care of lights, no? Well... Let's fit the battery. This time I used the proper nuts and bolts that came with the battery instead of the temp ones I was using and were getting rusty. And sanded the terminals on the car loom. I wonder if the problem with the car was bad connections to the battery due to rust and incorrect bolts... Turned the key and... First time!
OK... Lapped the garage over 10 times. Like a kid. With a new toy. :)
After these laps I identified or confirmed a couple of problems to tackle.
With no lights or running lights, the battery gives 13v to 14v, which means the alternator is charging it. On low beam the battery drops to 12v. I'm not sure if it charges at all at 12v (with the engine idling). I'm unsure if this is a problem or not...
Brakes do need bleeding, although not much. For effective braking, I need to pump once to get the peddle hard and then it works correctly.
The front wheel, driver's side, wobbles a bit. It needs tightening...
The headlights are not tightly bolted and so they move. Which probably is good because when I turn the steering completely to one side, the outer wheel hits the headlamp and moves it inside. When I finished my laps seemed the car was looking to something on the tip of its nose. Must find a way to reduce the turning radius of that steering.
I want a spring on the accelerator peddle to give me more feel and help the cable return.
Some 10 minutes after I turned the car off, the radiator leaked a bit. I'm not sure if this was because I didn't leave the fans working a bit after I turned the car off.
Next session will be engine service and tightening the front wheel.
Of course, I still need to fix the stuff I did wrong, service the engine, fit some needed mods... But... I have nothing more inside boxes. All is fitted to the car...
Today's session was to fix the tonneau. It was just a slow process of putting masking tape, marking a hole, drill, rivet the button in place, fix the tonneau, mark another hole, repeat. It took me a couple of hours. The buttons are a bit loose because the pop-rivet pliers could not hold the rivet correctly inside the button. Just as I was getting to the end of it (2 rivets to go) I noticed Steve from Aries had packed a bit of tube along with the buttons and rivets for this job. Putting the bit of tube over the rivet shaft allowed the gun to fix the rivet correctly in place and break the rivet cleanly. The last two are fixed as all should. Maybe one day I'll drill the others out and rivet them again properly. Maybe not... But another praise to Steve, he thought of these things and his attention to detail still amazes me.
Now I should take care of lights, no? Well... Let's fit the battery. This time I used the proper nuts and bolts that came with the battery instead of the temp ones I was using and were getting rusty. And sanded the terminals on the car loom. I wonder if the problem with the car was bad connections to the battery due to rust and incorrect bolts... Turned the key and... First time!
After these laps I identified or confirmed a couple of problems to tackle.
With no lights or running lights, the battery gives 13v to 14v, which means the alternator is charging it. On low beam the battery drops to 12v. I'm not sure if it charges at all at 12v (with the engine idling). I'm unsure if this is a problem or not...
Brakes do need bleeding, although not much. For effective braking, I need to pump once to get the peddle hard and then it works correctly.
The front wheel, driver's side, wobbles a bit. It needs tightening...
The headlights are not tightly bolted and so they move. Which probably is good because when I turn the steering completely to one side, the outer wheel hits the headlamp and moves it inside. When I finished my laps seemed the car was looking to something on the tip of its nose. Must find a way to reduce the turning radius of that steering.
I want a spring on the accelerator peddle to give me more feel and help the cable return.
Some 10 minutes after I turned the car off, the radiator leaked a bit. I'm not sure if this was because I didn't leave the fans working a bit after I turned the car off.
Next session will be engine service and tightening the front wheel.
Tuesday, September 23, 2014
Failed Drive
Today the garage was being washed. I got a borrowed spot on a different floor so that I could move the car there and get my spot washed. Unfortunately I didn't manage to start the car up. The battery gave up before the engine sprung to life. It was almost working but almost was not enough.
I've charged the battery to try again on the weekend. Could be because I tried to get it going with the hood on and it is not getting enough air (never had used it with the hood on). Can also be because I finished all the electrics and something is draining more battery (a bad earth?). And there is also the fact that the engine is really overdue to have a service. It contains oil that is 5 years old, the spark plugs are probably older, the filters are the ones that came with the engine...
Took the chance that had the battery in and tested the lights. Not that bad...
- Emergency lights -Only blinks the lights on the left side;
- Direction lights - When I signal left the right side lights turn on, when I signal right the left side lights go, so I wired the lever the wrong way. Easy fix...;
- Driving/Low beam/High beam lights - OK;
- Rear plate light - OK, turns on when driving lights are lit;
- Brakes - Not sure if right side lit up, left works;
- Rear presence lights - OK on both sides, when Driving or Low Beam (not sure which) turns on;
- Fog light - Did not light up and neither did the dash indicator. Forgot to try if it would work with high beam on, in case I mixed wires. Can also be a dead bulb. Can't be a fuse, I checked them recently.
Sunday, August 17, 2014
The Other Arch And Electrics
Based on prior experience, today I tackled the other arch. What took 2h30m for the right side took only 1h15m for the left side. I was amazed! And it looks a lot better! Well, on the pictures both sides look nice, but "on the flesh" it is different.

 Next step was to finish the electrics. Spent some time considering the best way to pass the cables from inside the arches to the boot. Final decision was to drill a hole, with the 12mm drillbit, on the rear panel, hidden by the arch. Put some rubber pipe to "line" the hole, avoiding chaffing the hires. Then get the wires through the hole.
 All wires crimped and connected. Just needs testing, which I couldn't do since the battery was not fitted. Next session will be lights testing and to fit the buttons for the boot cover.
Sunday, August 3, 2014
One Arch In, One To Go
My session started with a dying light. Four years ago when I bought my lamp, I also bought a spare bulb "just in case it blows and causes the end of a work session". It took some time, but turned out to be a wise move :)
The process of fixing the arch was not simple. Drilled on the arch two holes on the front-facing side and one on the rear facing side. Positioned the arch and marked the car where to drill to match the holes on the arch. Took extra care to centre the wheel correctly. Marked, drilled, bolted slightly in place, marked the inner of the arch where other holes should go, took the arch out, drilled it, masked the car, bolted the arch back, marked the masking tape, took the arch out, drilled the car, bolted it all back in... Through this process, had to do a couple of extra holes: one because behind the rear end there was a rail and I would not be able to fit the bolt. The other because of a marking error, hole should be 3mm to the side...
 Then the hard task started... When I was trying to bolt permanently the arch, it would not fit nicely near the top chassis rail. There was a gap between the arch and the side of the car. Had to undo most bolts, file down the arch a bit to make it sit better and tried bolting all back in. The self-tapping bolt that holds that seems to be too short for the gap and the "stress" the part is in... I will either have to get a longer bolt, undo it all and file a bit more or just forget about it.

 Lots of lessons learnt for when I get to do the other side. And yes, the light wires were not crimped nor connected. Next week or so...
The process of fixing the arch was not simple. Drilled on the arch two holes on the front-facing side and one on the rear facing side. Positioned the arch and marked the car where to drill to match the holes on the arch. Took extra care to centre the wheel correctly. Marked, drilled, bolted slightly in place, marked the inner of the arch where other holes should go, took the arch out, drilled it, masked the car, bolted the arch back, marked the masking tape, took the arch out, drilled the car, bolted it all back in... Through this process, had to do a couple of extra holes: one because behind the rear end there was a rail and I would not be able to fit the bolt. The other because of a marking error, hole should be 3mm to the side...
Saturday, July 19, 2014
Rear Arches With Lights
Some hours on the car to finish off the rear arches. First offered them to the car to validate that the lines drawn last week were level. Using the mobile phone app, it seemed perfect.
Using the circular adapter on the drill, prepared to cut the holes. First one was quickly done! This blade, that cuts aluminium, went through fiberglass like through butter. Adjusted the blade to make the next hole a bit larger. In the end, all four holes required different amounts of "enlarging by sanding" with the dremmel and a sanding cylinder.

 When all light pods could fit, placed some masked tape on the arches again and marked the holes for the bolts that hold the light pods to the arches. Had to improvise some bolts and nuts (leftovers from the tunnel panels) and only bolted two (instead of three) because the third one had what it seemed like an earth connection above the hole that was preventing me from putting the bolt. Anyway, two seem enough.

 Both arches were done, although I only picture one. Just need to make the holes through which bolts will go through to fix the arches to the car. Next session will be on the car, fitting the arches and the buttons for the tonneau cover.
Using the circular adapter on the drill, prepared to cut the holes. First one was quickly done! This blade, that cuts aluminium, went through fiberglass like through butter. Adjusted the blade to make the next hole a bit larger. In the end, all four holes required different amounts of "enlarging by sanding" with the dremmel and a sanding cylinder.
Friday, July 11, 2014
Marking Wheel Arches
Had a small work session. Spent the beginning of it trimming down the cuts I did previously. This allowed the arches to sit better on the car.
Then took a LOT of time trying to place the arches on the car to mark where to drill to fit the lights. It was a job that, if I had a helping pair of hands, would have done in less than 10 minutes. Alone, it took me almost an hour. In the end, I have two spirit-level-drawn lines on the arches and centres for the holes I'll be cutting next session.
Then took a LOT of time trying to place the arches on the car to mark where to drill to fit the lights. It was a job that, if I had a helping pair of hands, would have done in less than 10 minutes. Alone, it took me almost an hour. In the end, I have two spirit-level-drawn lines on the arches and centres for the holes I'll be cutting next session.
Sunday, June 29, 2014
Rear Wheel Arches Trimming
Small session working on the car. First task was to tie-wrap the extension wires I did last week to wire up the fog light on a LHD position. I had forgotten about holding the wires down and this got fixed.
Then spent some time trimming the rear wheel arches. After some looking into it, the trimming does make the arches fit a lot better. The picture below shows one arch trimmed and the other one yet to be trimmed so that the difference is visible.
 I've heard that Steve at Aries now has new moulds for the rear arches that do not require trimming. This could be nice although this trimming is not hard and didn't take long.
Next time I'll have to make the holes for the lights and then fit them to the car. I still have the boot cover buttons to fit, but today I didn't feel like doing that.
Then spent some time trimming the rear wheel arches. After some looking into it, the trimming does make the arches fit a lot better. The picture below shows one arch trimmed and the other one yet to be trimmed so that the difference is visible.
Next time I'll have to make the holes for the lights and then fit them to the car. I still have the boot cover buttons to fit, but today I didn't feel like doing that.
Sunday, June 22, 2014
More Work on the Rear
Another couple of hours on the car advanced the rear. No pictures because it's not quite visible.
Jacked the car up and riveted the rear panel to the chassis. Used 4 rivets under, two on the sides also under and two nearer the top against the chassis rail where the upper side of the coils fit.
Then used a bit of old wire and crimped an extension to the fog light wire. Connected it to the light pod and closed it. Just forgot to cable-tie the wire to the chassis, will have to do it next time.
Last job was to drill and fit the filler cap. This took a bit more work because the bolts were 4mm in diameter and I only had 3,5 and then a 4,75 drillbits. So I drilled with the 3,5mm and then used a file on the fiberglass to enlarge the holes to fit. Some time later, the fuel cap was in, bolted to the fiberglass and the ties on the hose also tightened.
Also removed the battery from the car and charged it in preparation for a drive soon.
Next session will be the buttons for the cover and then start on the rear wheel arches.
Sunday, June 15, 2014
More Bodywork Done
Got to the car and something was niggling the back of my head. I still had the rear loom in one roll on top of the fuel tank. So, my first task was to lay out the wires and fix them in place with wraps, ensuring there would be no chaffing. Tried several layouts, specially because photos I saw had the loom between the rear panel and the fuel tank. In the end I opted for having the loom between the diff and the fuel tank. Now I just need to buy some more electrical wire to make an extension for the fog light wires to reach the fog light on a LHD position. Used one of the fuel tank bolts to attach the earth wires to the chassis.
After this, opened up the sikaflex and grabbed the front wings. It was a bit messy but not much of a story to it. Wings are wired, sikaflexed and bolted into place. I haven't tried the indicators to confirm all is well, need to recharge the battery, but at least it looks nice.

 Then it was time for the rear panel. A lot of sikaflex around the top and bottom, to hold it in place. Left that to dry, will put the rivets underside next time.
Crimped the plate light wires, connected them and closed that light pod. Also put the filler cap in place, although it is not drilled and bolted to the panel yet.
Finally, fitted the boot cover just to see how it looked and where I would need to drill to install the buttons the cover attaches to. Not bad... Not bad at all...

 Next session will be mostly drilling the rear panel to rivet underside, fit the filler cap and the boot. My driller's vacations are about to be over!
After this, opened up the sikaflex and grabbed the front wings. It was a bit messy but not much of a story to it. Wings are wired, sikaflexed and bolted into place. I haven't tried the indicators to confirm all is well, need to recharge the battery, but at least it looks nice.
Crimped the plate light wires, connected them and closed that light pod. Also put the filler cap in place, although it is not drilled and bolted to the panel yet.
Finally, fitted the boot cover just to see how it looked and where I would need to drill to install the buttons the cover attaches to. Not bad... Not bad at all...
Sunday, May 25, 2014
K.I.S.S. on the Rear
Often used and often forgotten acronym in IT is "K.I.S.S.": Keep It Simple (and) Stupid.
Grabbed a plastic sleeve used to fit bolts on walls and cut it to size. Got the size right at the third attempt. Bolts tightened and now I have the fog light in place, correctly angled, without more messing with aluminium scraps.
 The session was small and most of the remaining time was spent looking at tasks ahead and trial fitting things. Trial fitted the rear wings. They fit quite OK (or I'm lowering standards as I get near the end). I could almost fit it straight away as is...
Then I unpacked the leather boot cover and looked into the buttons that I have to fix to the rear to button the cover to. They are held with rivets, so I'm not worried about having to look for yet another tool.
So, planning next tasks, by the correct order... 1) Open the sikaflex and fix front wings in place; 2) Fix rear with sikaflex; 3) Crimp loom wires, connect to rear lamps and close them; 4) Jack the car up and rivet the rear underside (as per instructions); 5) Drill rear for filler cap bolts; 6) Drill rear for boot cover buttons.
Grabbed a plastic sleeve used to fit bolts on walls and cut it to size. Got the size right at the third attempt. Bolts tightened and now I have the fog light in place, correctly angled, without more messing with aluminium scraps.
Then I unpacked the leather boot cover and looked into the buttons that I have to fix to the rear to button the cover to. They are held with rivets, so I'm not worried about having to look for yet another tool.
So, planning next tasks, by the correct order... 1) Open the sikaflex and fix front wings in place; 2) Fix rear with sikaflex; 3) Crimp loom wires, connect to rear lamps and close them; 4) Jack the car up and rivet the rear underside (as per instructions); 5) Drill rear for filler cap bolts; 6) Drill rear for boot cover buttons.
Sunday, May 11, 2014
Continuing with Rear of Car
Another session dedicated to the rear panel. Started with masking up to mark where plate and fog lights should go. Regarding the fog light, to run in Portugal it has to be on the left but for the UK's IVA it has to be on the right. I marked and drilled on both sides. After IVA I'll install a reversing light on the UK's holes. Using an old licence plate I had, tested how it would look.


After fitting the plate and fog lights, took the rear to the car and checked how the fog light had to be. The problem is that the rear has a slope and the fog light must be perpendicular to the road. So it has to take some wedge behind to make it stay in place. With a piece of scrap aluminium I made a part to go behind the light and that should do the job. Using the mobile phone with the inclinometer app, could check when the light was on the correct position. Unfortunately, the part I made was not a good fit, requires more work and I didn't have more time.


Still had time to look into the rear loom and check what connectors I need to add to the shop list.
After fitting the plate and fog lights, took the rear to the car and checked how the fog light had to be. The problem is that the rear has a slope and the fog light must be perpendicular to the road. So it has to take some wedge behind to make it stay in place. With a piece of scrap aluminium I made a part to go behind the light and that should do the job. Using the mobile phone with the inclinometer app, could check when the light was on the correct position. Unfortunately, the part I made was not a good fit, requires more work and I didn't have more time.
Still had time to look into the rear loom and check what connectors I need to add to the shop list.
Saturday, May 10, 2014
TO-DO List for Track
Time to get organised... A list of tasks needed to take the car to a track. And, where something is needed, what is so that I can organise a shopping spree (mostly ordering online from the UK due to differences in prices, I believe).
- Bleed brakes properly
Finish rear of carDrill for fog light on both sides and put it on the left for nowDrill for license plate light and fix itCrimp wires on loom for the needed fittingsSHOP LIST: 10 spades and 10 covered females (blue)Fit rear (sikaflex 221 arrived)Drill for and fit filler cap boltsDrill for and rivet boot cover buttonsPut on front wheels' cycle wings (sikaflex 221 arrived)Put on rear wheels' wingsTrim to fitDrill for stops and indicatorsFit to the carService the engineSHOP LIST: At least 3,5L of Oil - API grade SF or SG (SAE 10W40)SHOP LIST: Oil filter (i.e. HiFlo HF 303) - http://www.texoleo.com/SHOP LIST: Air filter (i.e. HiFlo HFA1901)SHOP LIST: Spark plugs (i.e. NGK CR9EH-9 or NGK CR9EHIX-9)SHOP LIST: Gap-filler toolSHOP LIST: Oil filter wrenchDo the serviceRe-tighten headlight bolts(this is an issue with having a shortened rack; wheels hit headlights on full lock...)- Re-tighten front wheel nuts
- May require taking wheels out, filing bent threads on studs and new nuts
Friday, May 2, 2014
Rear of the Car
Took a vacation day and spent some hours on the car. Main task was to work the rear fibreglass part.
Spent some hours trimming it to fit correctly on the car. Had to trim near the rollbar stays, to clear the shocks behind the wheels and for the tow hook to clear on the rear. It was time consuming so that it would look well, but it was worth it.
Then I marked where the fuel filled should go. Using the cork seal of the filler cap as template, marked the rear to be drilled. Using the circular cutting adapter on the drill, cut the circle. Since the tool is not precise, I left a bit of a margin. Spent some extra time with the sanding head on the dremmel triming it so that the filler cap would fit the hole. The final result is on the pictures below.
 Then I looked into the other two things that must go on that part: fog light and license plate light. Regarding the fog light, this must be on the road side of the car. That means on the left side in Portugal but on the right side in the UK. Since I want to get the car road-legal in the UK, I need to comply with those rules. But I want to drive the car here with safety. I was wondering what to do and ended up sending an email to Steve at Aries. He replied saying the light had to be on the centre or the right but advising for me to put it on the right and later move it to the left and put the reversing light (that the car was not going to have) on the right, using the same holes. This sounds like a great idea, so it's what I'll be doing next time.
Spent some hours trimming it to fit correctly on the car. Had to trim near the rollbar stays, to clear the shocks behind the wheels and for the tow hook to clear on the rear. It was time consuming so that it would look well, but it was worth it.
Then I marked where the fuel filled should go. Using the cork seal of the filler cap as template, marked the rear to be drilled. Using the circular cutting adapter on the drill, cut the circle. Since the tool is not precise, I left a bit of a margin. Spent some extra time with the sanding head on the dremmel triming it so that the filler cap would fit the hole. The final result is on the pictures below.
Sunday, April 20, 2014
Front Wings Wiring
Worked on the car a bit this morning. Main job was to cut wires, crimp them and use plastic ties to hold them. All for the indicators on the front wheel wings. Had to trial fit the wings and was happy with the result. Now the wires are in place and all is ready for the wings to be mounted. This took me an unexpected hour and a half!
Also cleaned the connections from the loom to the battery. One was showing some green stuff (like when 1,5v batteries drip their contents). This because last week I tried to make the car run but it failed. Probably was because the battery was not topped. Anyway, today, after checking the terminals and with a freshly charged battery, the car worked. Just had it for a while on neutral revving and then shut it down. The new gear knob makes it a lot easier to find the neutral!
The reason I haven't fixed the wings yet is because I'm missing the polyurethane for the extra fixing. Looked for Sikaflex or Tiger Seal around and, although there is a Sika branch in Portugal, I was unable to find it. Or a proper replacement. Ended up ordering Sikaflex 221 from the UK through eBay, due to arrive later this week or the next.
Sunday, April 13, 2014
Gear Lever Knob
Didn't work on the car today. But went there to check what stuff I needed to buy to finish off the wiring on the front wings.
Also took the chance to fit a gear lever knob that I bought on the cheap. It looks OK and it makes using the gear shift a lot easier. The original stick is small and the handbrake makes it harder to grab it. With the knob, it is easier to grab and shift. Took me 10m to fit.

 Designed on the Netherlands, made in China. Fake carbon and aluminium.
Also took the chance to fit a gear lever knob that I bought on the cheap. It looks OK and it makes using the gear shift a lot easier. The original stick is small and the handbrake makes it harder to grab it. With the knob, it is easier to grab and shift. Took me 10m to fit.
Sunday, April 6, 2014
Front Wings Ready to Go!
Had some time on the car today. My idea was to trim the fron wings so that the wheels could be removed without clashing. But decided this didn't make much sense so I grabbed a pipe and a huge wrench and re-bent the wing stays to give more clearance. Then placed the wings on them and drilled them with the 3,5mm drillbit, marking the stays for further drilling.
Then, using a bit of rope and a wrench as weight, marked a vertical passing through the centre of the wheel and drilled the wing laterally for the indicator light.
Removed the wings and enlarged the holes on the stays with the 6mm.
Back on the storage room, enlarged the holes to 6mm. Since they will get the doomed-head bolts with the square section, as the nosecone, had to work with the file to make the holes square.
On the side holes, used the 12mm drillbit to further enlarge the hole. Then used the small diameter sanding head on the dremmel to make the hole bigger. Switched to the large diameter sanding head and after a bit more sanding, the rubbers fit correctly. Then inserted the indicators on the rubbers.
 Just need to get some PU adhesive (the one I have is now dry) and add wires from the indicators to the engine bay and I can put the front wings in place.
After all this, filled the tank with 10L of gas and mounted the battery (that was charged 3 weeks ago) to try to get the car for a spin inside the parking space. Unfortunately, the battery was reading 11,5v when I tried starting the engine for the first time. It did not had enough juice to get the car going. Next time I try, I'll have to try on the day I charge the battery.
Still managed to see that I wired the indicator stalk on the steering column incorrectly. It blinks the right side when it should blink the left and vice-versa (of the nosecone indicators, the only ones already in).
It was odd that, when I removed the battery after trying to start the car, both positive and negative bolts were very hot. I never noticed this before. I wonder if I have a short or something and that is why it failed to start today.
Then, using a bit of rope and a wrench as weight, marked a vertical passing through the centre of the wheel and drilled the wing laterally for the indicator light.
Removed the wings and enlarged the holes on the stays with the 6mm.
Back on the storage room, enlarged the holes to 6mm. Since they will get the doomed-head bolts with the square section, as the nosecone, had to work with the file to make the holes square.
On the side holes, used the 12mm drillbit to further enlarge the hole. Then used the small diameter sanding head on the dremmel to make the hole bigger. Switched to the large diameter sanding head and after a bit more sanding, the rubbers fit correctly. Then inserted the indicators on the rubbers.
After all this, filled the tank with 10L of gas and mounted the battery (that was charged 3 weeks ago) to try to get the car for a spin inside the parking space. Unfortunately, the battery was reading 11,5v when I tried starting the engine for the first time. It did not had enough juice to get the car going. Next time I try, I'll have to try on the day I charge the battery.
Still managed to see that I wired the indicator stalk on the steering column incorrectly. It blinks the right side when it should blink the left and vice-versa (of the nosecone indicators, the only ones already in).
It was odd that, when I removed the battery after trying to start the car, both positive and negative bolts were very hot. I never noticed this before. I wonder if I have a short or something and that is why it failed to start today.
Saturday, March 15, 2014
Hood Fixed and Start on Front Wings
This weekend managed 3 hours Saturday instead of the usual Sunday morning. Spent them on two major tasks.
First I made a paper template of the holes for the hood's rubber straps. Then I went on the car, juggled a bit the hood to be sure it was in place and marked one corner, using paper tape glued over and the template to draw dots on the tape. Drilling (3,5mm) and riveting and it was done.

 Then I moved to the front wheel wings. Did some fine-tuning on the stays and then tried to mark where to drill for the bolts but decided I first should trim the sides of the wings. I either bended the stays too near the tires or they really need trimming otherwise the wheels can't come out without hitting the wings. Also marked where to drill for the side lights. After marking, packed and went home.
First I made a paper template of the holes for the hood's rubber straps. Then I went on the car, juggled a bit the hood to be sure it was in place and marked one corner, using paper tape glued over and the template to draw dots on the tape. Drilling (3,5mm) and riveting and it was done.
Sunday, March 9, 2014
Scuttle and Bulkhead
A couple more jobs done today.
Had to fix again the terminals on the wires for the oil pressure. One was pulled like if someone had given a pull on the wire. When I was working on it, since both wires were ties together, I pulled the other one...
Then, held the scuttle in place and drilled through the bulkhead and scuttle to hold the two pieces together. Released the scuttle to enlarge the holes and insert rivnuts. After that, got it in place and held it down on the chassis and the bulkhead to it. Since this part was done, attached the dash back to the bulkhead. The car is drivable once again!
Then I moved into understanding how the rubber straps that hold the hood on the car have to be installed. Was interrupted by a visiting neighbour. Since I had promised to take the kid to the movies after lunch, packed it all up after the neighbour was gone. Just spent 5 minutes on the storage room testing the strap with two pieces of wood. I understood the logic, just need to make a template with the distance between holes and then drill the chassis and hood. But it will have to be next week.
Sunday, March 2, 2014
Small Things Under the Hood
Finally a morning working on the car!
Sorted the wiring on the dash. After reading my previous post, colleague builder Iain sent me a message saying that his car has a dangling purple wire on the digidash side. Armed with that, I confirmed that the other dangling was a match with the sole one from the loom and the dash is fully wired! THANK YOU, Iain! Can't thank you enough for these helps you give me!
Then I cut two lengths of wire to extend from the loom to where I'll have the brake oil pressure sensors (lids of the master cylinders). My current cylinder caps don't have sensors but I'll eventually get around to get some replacements, so the wire will be needed. And since I was messing with wires...
Third task was to make sure I had hood and scuttle on their final position. Still had to sand a bit the hood near the airbox to get a perfect fit. When I was happy with it, marked the chassis rails through the scuttle and then removed the parts and drilled.
Final task was to get the bulkhead in position and drill a few holes through it into the chassis to hold it down. It was until now in place only with the two bolts that hold the accelerator peddle to the chassis. Removed the bulkhead, enlarged the holes on the chassis and inserted rivnuts. Bulkhead back in and fixed down with bolts through the rivnuts.
Had to call it a day. Very happy with what I did, got rid of lots of small things. Next is fixing the bulkhead to the scuttle, the scuttle to the chassis and dash back at the scuttle. Then clamps for the hood.
Sunday, February 2, 2014
Wiring, the Hated
Did I ever say electrics is the least fun part of this? Spent the small session today doing just that. The hour sums up to 3 cables laid down.
The loom caters for indicators on the scuttle. With new regulations (or interpretation of), the indicators must now be on the outside of the front wheel arches. Cut two bits of wire to go from the original connectors to near the arches, inside the engine bay. Then created a "v"-shaped bit that connects to the front indicators earth to be used by the ones on the wheel arches, because I did not have enough cable to pull it from near the scuttle. Placed a couple of tie-wraps and tucked the wires inside the convoluted tube I have on the bay to make it look less messy.
Then I still started looking at the wires behind the dash, but had to leave before archiving anything. The problem is that the loom that exits the Digidash has 2 dangling wires and the car loom only has one dangling. I have to figure out what is missing and what to connect where.
I don't like electrics because I don't understand them well. I don't like because I'm slightly colour-blind and distinguishing tones (pink and purple; black or dark-blue; ...) to make connections is not fun.
Next tasks... Probably in the order I need to sort them... Fix the wiring on the dash; attach the front wings with the indicators and connect them to the loom; get the scuttle fixed on the chassis, the bulkhead on the chassis and the scuttle on the bulkhead; attach the rubber catches to the hood and sides to hold the hood in place. Then, move to the rear of the car!
Saturday, January 25, 2014
More Hood and Tunnel Done
Nice work session. First task was to finish enlarging the hood hole to provide clearance for the airbox to come out. Eventually got done. Some trimming and polish on the hole borders and it was time to move on. The more I look to it, the more I want to try to modify the airbox to have a front-facing hole for the air to enter instead of the two original air entries that now sit under the hood.
With the hood sitting as final, marked where on the chassis I need to drill to fix the scuttle. Then removed it and started work to close the tunnel. Enlarged the previously marked bit of the tunnel panel. Tried it and it worked fine. Noticed how much of my foot protrudes into the tunnel. My foot there is safe, thanks to the prop catcher I added on that area. So, I just needed something to prevent my foot going too much inside and water coming in from there. Created a guard from a bit of scrap ally and used rivnuts to attach it to the tunnel cover. Tested it not only to check if my foot moved correctly but also if the part slid into place with the guard or it had to be attached afterwards. Since it slid with the guard, applied some plastic on the area to prevent water from getting in and closed the tunnel.

 While closing the tunnel I noticed that there is still one wire under the dash that comes from the loom and connects nowhere. And two from the digidash not connected anywhere. I believe these are related to the indicators, but unsure. Something to tackle later.
But next steps are to put in the wires from the loom to near the headlights, for the front wing indicators. Then fix the scuttle into place and attach the hood catchers to the hood and car.
With the hood sitting as final, marked where on the chassis I need to drill to fix the scuttle. Then removed it and started work to close the tunnel. Enlarged the previously marked bit of the tunnel panel. Tried it and it worked fine. Noticed how much of my foot protrudes into the tunnel. My foot there is safe, thanks to the prop catcher I added on that area. So, I just needed something to prevent my foot going too much inside and water coming in from there. Created a guard from a bit of scrap ally and used rivnuts to attach it to the tunnel cover. Tested it not only to check if my foot moved correctly but also if the part slid into place with the guard or it had to be attached afterwards. Since it slid with the guard, applied some plastic on the area to prevent water from getting in and closed the tunnel.
But next steps are to put in the wires from the loom to near the headlights, for the front wing indicators. Then fix the scuttle into place and attach the hood catchers to the hood and car.
Sunday, January 12, 2014
Hood Continued
Most of today's session was on the hood. But before I trial-fitted the tunel side plate and tested using the peddle with the new hole. It is a lot better, I can accelerate without stepping also on the brakes. The only problem is if I push back the foot too much and then try to move it to the brakes, it seems to get a bit caught. Marked for further cutting.
Then trial fitted the hood. Marked for more cutting and trimming and went through a few iterations of fitting, marking, cutting, fitting. In the end, my time was up and the hood still requires a very small trim on one side. It already fits but not perfectly. Anyway, left the part on the car and first took these pictures. Scuttle is also just placed there, not attached.


Then trial fitted the hood. Marked for more cutting and trimming and went through a few iterations of fitting, marking, cutting, fitting. In the end, my time was up and the hood still requires a very small trim on one side. It already fits but not perfectly. Anyway, left the part on the car and first took these pictures. Scuttle is also just placed there, not attached.
Sunday, January 5, 2014
Hood and Tunnel
First time on the car in a long time... And with a new year's resolution: to get the car on a track this year.
Fit loselly the scuttle and sticked some isolation sponge on the nose and scuttle so that I could put the hood in place. Then, spent some time measuring where I should cut the hood so that the airbox can protrude out. After some time, it was roughly measured for a first cut. I'm sure after this one I'll be doing a lot of trimming to get it right because it is really hard to mark where to cut from underneath.

 Also measured the tunnel cover bit near the peddles, that I had to remove to be able to drive because my feet are too large. With the measured parts, went to the storage room and did some cutting. The tunnel bit drilled the corners and cut the rest with the saw. The hood was done with the cutting disk on the dremmel.


I did not have time to trial fit and check what more needs cutting, that will have to be done next session.
Fit loselly the scuttle and sticked some isolation sponge on the nose and scuttle so that I could put the hood in place. Then, spent some time measuring where I should cut the hood so that the airbox can protrude out. After some time, it was roughly measured for a first cut. I'm sure after this one I'll be doing a lot of trimming to get it right because it is really hard to mark where to cut from underneath.
I did not have time to trial fit and check what more needs cutting, that will have to be done next session.
Subscribe to:
Posts (Atom)