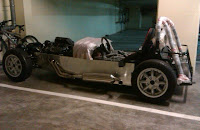
Today went to the car to fix the leak, the "clang" noise and get it ready to drive around the garage with the kid, the wife, show it off to my parents, get some footage and pictures... But it did not go well.
Was looking into the leak when I noticed the "T" piece where the leak was coming from had a dark vein. Fiddle with it a bit more, turns out it was a crack and, suddenly, it just snaps. With pliers, tried taking the bits out, to no avail. Had to cut 2cm off each pipe. Now I need a new "T" piece, preferably in (non-rusting) metal. Let's see how lucky I get during the week...
Jacked the rear up and took a part of the tunnel cover out to trace the "clang". Spinning the rear wheels by hand, to get the prop turning, it was not obvious what hit; nothing was hitting, no noise. Probably it's something that only happens when there is some tension, that I could not recreate. Hunch was that a grease nipple was scratching the prop catcher. Filed a bit of the prop catcher away, just in case. But proper solution will have to be found out later.
Finished off earlier because I was sad and mad with the broken "T" and the fact that my plans for the afternoon were shot.
Build diary for my first kit car: an Aries Locoblade (http://www.ariesmotorsport.com/) that I will be building in Portugal for the next months (or years).
Sunday, July 28, 2013
Tuesday, July 23, 2013
Driving! (2 in 1)
So, garage washing this time was floor 0 on Monday, floor -1 and -2 on Tuesday. My spot is on -2 and I got a borrowed one on 0.
On Monday went to the car after dinner. Wired the battery in and sat on the driver's seat. On Sunday I had noticed that, now that the tunnel has the aluminium panels in, my right foot would hit the brake when pressing the throttle. I was wearing my large basket boots so this time I took my Brazilian "Havaianas" (olá, Glauco!). Even with them, the foot hit both peddles. So, the front of the side panel was removed (fortunately, at the time I had to cut it to get it in without taking out the peddle box, and fortunately it was rivnuted into place).
With the car on, I drove it off. It was doing an odd "clang" noise from the tunnel, repeatedly, as if something on the transmission was hitting something. My fear was the UJ on the front half of the transmission hitting the prop-catcher. Slowly, did the 50m from my spot to the start of the spiral that goes from floor -2 to floor 0. Stalled the car two or five times just in that bit. Then, going up the slope, some 5 times more. Since the brakes are still not great, relied on the handbrake to hold me each time I stalled. In the beginning had the lights on but turned them off to save battery. On the 2nd section of the spiral, stalled some more and when I was almost at the top, the battery was drained to the point where the car would not start. Had to call the caretaker, that has his watching post at the top of the spiral, to help me push the car into place. After parking it there, had a look around for leaks, took out the battery and went home. The car in his borrowed space:
Tuesday after dinner went down (with the charged battery) again. This time it was easier. After wiring it all up, it was just a matter of reversing out of the spot and then moving away. From 0 to -2 is downhill so no stalling. Still the odd "clang". With the car back on his spot confirmed that there was a leak on the cooling circuit near the "T" that splits header-pump-radiator (where it leaked last year too).
Not as nice as I expected, but it was fun anyway. The best part is that last year, after parking it, I knew I had to undo a lot of things to get them properly done. This time I have it mostly final and from now on is just fixing the noise and the leak and put the bodywork.
Sunday, July 21, 2013
Getting the Car to Run
I needed to confirm that the car would run, to know if I could move it Monday night. First task was to really get it running. Placed the full battery and connected it. Bolted down the driver's seat (which was a pain, now that I have the external panels getting in the way). Sat down and cranked the engine. First attempt, failed. Rested a bit, second attempt. Hand on the exhaust, I could feel some blobs of air coming out. It was trying... Rested some more, third attempt and it started running!
Left it idling and took a walk around the car looking for leaks and other problems. There was some smoke coming from where the headers bolted to the engine, I wondered if it was the exhaust paste cooking or some leaks. In the end, it was just the paste. The idle was a bit high, at 4.000 rpm, so I got it down to 1.900rpm. Checked the cooling level and all was good.
Turned the engine off, bolted the passenger's seat down and then the headlights. I don't have bullet wire terminals, so butchered a temporary job just to get them working. Tested standing, dip and main and all worked, although probably not pointing exactly in the right directions... The car was ready!
Saturday, July 20, 2013
Headlights, Side Panel and Exhaust
The garage is being washed on Monday and Tuesday. I've got a borrowed spot on a different floor so that I can move the car during the night and get my spot washed. So, just like last year, it's move time!
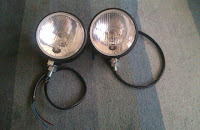
Started by assembling the headlights. The lamp case had a rubber seal that had to be removed to put the dip and main lights lamp. Rubber seal back on, another seal had to come off for the standing lamp. Get the wires plugged and the wires through the hollow bolt on the casing and use the pins I'm holding on first photo to hold the lamps casing against the rim of the outer case. The rim had some groves where it slotted. Then bolt the rim to the outer case and job done. First one took me almost an hour, the second one less than 10 minutes. Experience does count!
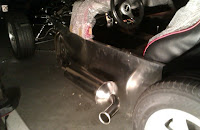
Then, already on the garage, jacked the car up and riveted and rivnuted the underside of the panel. It went well so I could move to the next phase: grabbed the exhaust can, fitted it to the other part of the exhaust and held it all with ropes and the jack to get it in position. Drilled the plate that was on the can to attach to the car and the floor of the car. Bolted it all and it was all good. Before assembly I put exhaust assembly paste on the junctions. Then tightened the bolts on the clips that help hold the exhaust together.
This was all for the day. Jacked the car down and took the battery home to charge it. Sunday would be to try to get the car moving and do other small jobs.
Sunday, July 14, 2013
Riveting the Cut Out Panels
Started the session with the file and rounding out the hole for the exhaust. The panel that is going to be rivnut'ed in did not slide to position as nicely as I wanted due to some pressure from the exhaust pipes. After some time filing in, it slid perfectly. Time to drill aluminium panel and chassis, then enlarge the chassis holes and put the rivnuts in. Bolted the panel and this task was done.
Held the front panel piece in place with a clamp and drilled for the rivets. Unfortunately, the engine being there, the panel moving slightly and me not paying enough attention made this task take ages. Had to realign or enlarge holes on the panel to make them fit with the holes on the chassis. Then I had a big fight with my PU adhesive bottle. It had gone dry and I was not able to extract any from it. After some wasted time trying to unclog it, and since I believe this will be the last time I'll use it, I just cut through the bottle. With the hacksaw blade posing as a knife, spread the adhesive on the panel as if it was Nutella on bread. Riveted the upper side and held the lower with clamps, to get the adhesive to dry in place.
On the picture it is not noticeable, but the front part ended up not fitting perfectly on top, because of the drilling issue. This means I have a 2cm (almost 1 inch) gap between that panel and the one held with rivnuts. It does not look that nice. I'll have to see if I can hide that later.
Next time I'll be jacking the car up (again), riveting (and rivnuting) the underside and putting the exhaust box in. Then, headlights and some driving!
Subscribe to:
Posts (Atom)


