Saturday, July 19, 2014

Rear Arches With Lights

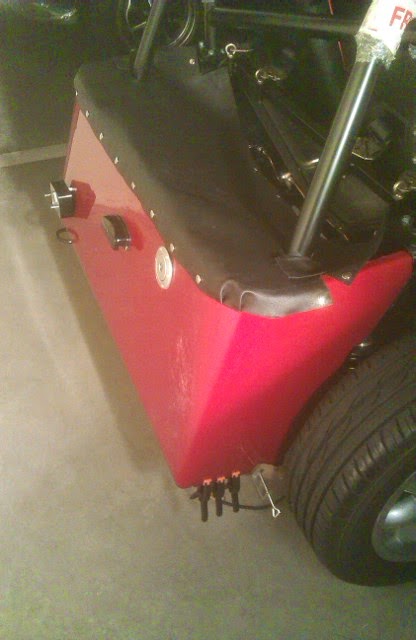
Some hours on the car to finish off the rear arches. First offered them to the car to validate that the lines drawn last week were level. Using the mobile phone app, it seemed perfect.

Using the circular adapter on the drill, prepared to cut the holes. First one was quickly done! This blade, that cuts aluminium, went through fiberglass like through butter. Adjusted the blade to make the next hole a bit larger. In the end, all four holes required different amounts of "enlarging by sanding" with the dremmel and a sanding cylinder.
When all light pods could fit, placed some masked tape on the arches again and marked the holes for the bolts that hold the light pods to the arches. Had to improvise some bolts and nuts (leftovers from the tunnel panels) and only bolted two (instead of three) because the third one had what it seemed like an earth connection above the hole that was preventing me from putting the bolt. Anyway, two seem enough.
Both arches were done, although I only picture one. Just need to make the holes through which bolts will go through to fix the arches to the car. Next session will be on the car, fitting the arches and the buttons for the tonneau cover.

Friday, July 11, 2014

Marking Wheel Arches

Had a small work session. Spent the beginning of it trimming down the cuts I did previously. This allowed the arches to sit better on the car.
Then took a LOT of time trying to place the arches on the car to mark where to drill to fit the lights. It was a job that, if I had a helping pair of hands, would have done in less than 10 minutes. Alone, it took me almost an hour. In the end, I have two spirit-level-drawn lines on the arches and centres for the holes I'll be cutting next session.

Sunday, June 29, 2014

Rear Wheel Arches Trimming

Small session working on the car. First task was to tie-wrap the extension wires I did last week to wire up the fog light on a LHD position. I had forgotten about holding the wires down and this got fixed.

Then spent some time trimming the rear wheel arches. After some looking into it, the trimming does make the arches fit a lot better. The picture below shows one arch trimmed and the other one yet to be trimmed so that the difference is visible.
I've heard that Steve at Aries now has new moulds for the rear arches that do not require trimming. This could be nice although this trimming is not hard and didn't take long.

Next time I'll have to make the holes for the lights and then fit them to the car. I still have the boot cover buttons to fit, but today I didn't feel like doing that.

Sunday, June 22, 2014

More Work on the Rear

Another couple of hours on the car advanced the rear. No pictures because it's not quite visible.

Jacked the car up and riveted the rear panel to the chassis. Used 4 rivets under, two on the sides also under and two nearer the top against the chassis rail where the upper side of the coils fit.

Then used a bit of old wire and crimped an extension to the fog light wire. Connected it to the light pod and closed it. Just forgot to cable-tie the wire to the chassis, will have to do it next time.

Last job was to drill and fit the filler cap. This took a bit more work because the bolts were 4mm in diameter and I only had 3,5 and then a 4,75 drillbits. So I drilled with the 3,5mm and then used a file on the fiberglass to enlarge the holes to fit. Some time later, the fuel cap was in, bolted to the fiberglass and the ties on the hose also tightened.

Also removed the battery from the car and charged it in preparation for a drive soon.

Next session will be the buttons for the cover and then start on the rear wheel arches.

Sunday, June 15, 2014

More Bodywork Done

Got to the car and something was niggling the back of my head. I still had the rear loom in one roll on top of the fuel tank. So, my first task was to lay out the wires and fix them in place with wraps, ensuring there would be no chaffing. Tried several layouts, specially because photos I saw had the loom between the rear panel and the fuel tank. In the end I opted for having the loom between the diff and the fuel tank. Now I just need to buy some more electrical wire to make an extension for the fog light wires to reach the fog light on a LHD position. Used one of the fuel tank bolts to attach the earth wires to the chassis.

After this, opened up the sikaflex and grabbed the front wings. It was a bit messy but not much of a story to it. Wings are wired, sikaflexed and bolted into place. I haven't tried the indicators to confirm all is well, need to recharge the battery, but at least it looks nice.
Then it was time for the rear panel. A lot of sikaflex around the top and bottom, to hold it in place. Left that to dry, will put the rivets underside next time.
Crimped the plate light wires, connected them and closed that light pod. Also put the filler cap in place, although it is not drilled and bolted to the panel yet.
Finally, fitted the boot cover just to see how it looked and where I would need to drill to install the buttons the cover attaches to. Not bad... Not bad at all...
Next session will be mostly drilling the rear panel to rivet underside, fit the filler cap and the boot. My driller's vacations are about to be over!

Sunday, May 25, 2014

K.I.S.S. on the Rear

Often used and often forgotten acronym in IT is "K.I.S.S.": Keep It Simple (and) Stupid.
Grabbed a plastic sleeve used to fit bolts on walls and cut it to size. Got the size right at the third attempt. Bolts tightened and now I have the fog light in place, correctly angled, without more messing with aluminium scraps.
The session was small and most of the remaining time was spent looking at tasks ahead and trial fitting things. Trial fitted the rear wings. They fit quite OK (or I'm lowering standards as I get near the end). I could almost fit it straight away as is...
Then I unpacked the leather boot cover and looked into the buttons that I have to fix to the rear to button the cover to. They are held with rivets, so I'm not worried about having to look for yet another tool.
So, planning next tasks, by the correct order... 1) Open the sikaflex and fix front wings in place; 2) Fix rear with sikaflex; 3) Crimp loom wires, connect to rear lamps and close them; 4) Jack the car up and rivet the rear underside (as per instructions); 5) Drill rear for filler cap bolts; 6) Drill rear for boot cover buttons.

Sunday, May 11, 2014

Continuing with Rear of Car

Another session dedicated to the rear panel. Started with masking up to mark where plate and fog lights should go. Regarding the fog light, to run in Portugal it has to be on the left but for the UK's IVA it has to be on the right. I marked and drilled on both sides. After IVA I'll install a reversing light on the UK's holes. Using an old licence plate I had, tested how it would look.

After fitting the plate and fog lights, took the rear to the car and checked how the fog light had to be. The problem is that the rear has a slope and the fog light must be perpendicular to the road. So it has to take some wedge behind to make it stay in place. With a piece of scrap aluminium I made a part to go behind the light and that should do the job. Using the mobile phone with the inclinometer app, could check when the light was on the correct position. Unfortunately, the part I made was not a good fit, requires more work and I didn't have more time.

Still had time to look into the rear loom and check what connectors I need to add to the shop list.